Game Design Workshop with Mayamada
Who are Mayamada?

They are a UK based, manga publishing company, as well as in charge of making events centred around games development, by making workshops in exhibitions across the world as well as in schools, colleges, and universities.
We had a workshop which centred around my class learning how to design and develop games. The aim of the workshop was to give an insight onto how a real team would communicate with each other, given strict restrictions.
The main workshop event we had was to develop a tabletop game, with the theme being "buying and selling", as well as having to be Family Friendly, 2 to 4 players, and we were given an hour to do so.
I found it quite challenging but enjoyable as I was in a group of 5 total people. Where each of us had a different set of skills that we had to somehow incorporate and collaborate with each other.
Industry roles, i.e How is a game made?
A game takes a lot of knowledge and skill of technical and creative aspects during game development. There is going to be people in charge of coding the game, people in charge of the art, people in charge of sound and music design, A producer to make sure things are running smoothly, a director that ensures the creative vision isn't lost. Sometimes some of these things need to be outsourced, like Quality Assurance, which is bug squashing, or extra staff needed to run the online aspects of a game, and so on. This show cases how much work and time is needed for a game of a high budget.
Video
We were shown a video beforehand, on how important game design is. As in game design, there is generally 5 accepted aspects of game design. Spacing, Components, Mechanics, Goals, and Rules.
Here is what they are and mean in more detail:
- Spacing: This is the space the game takes place in, it is the vibes and themes of how your game is going to look like.
- Components: Is the game pieces, the characters, objects, tokens, currency that you are going to interact with.
- Mechanics: The gameplay loop, what verbs can the players do with the components in the spacing they're given.
- Goals: What is the goal that you want the players to achieve? Is it a simple, go to the right of the level, hit a flagpole, and badabing, badaboom you finished the level? Or is it something more intricate like saving and reconnecting an apocalyptic United States, in which you must travel across a miserable wasteland, while you must also open up about your emotional wellbeing. So basically an end goal or score for the player to reach. The game can also not feature any or much goals, like Minecraft, just building with your friends, and rather is just an experience, which can be a goal for them to accomplish
- Rules: It is the restrictions set upon by the game developer and designers on what the players can and can not do in the sandbox provided by the game.
Design Challenge
As mentioned before, we had a workshop in which we had to develop a tabletop game, theme being "buying and selling", as well as having to be Family Friendly, 2 to 4 players, and we were given an hour to do so. I had myself, Kamal, Eshan, Sayamm, and Kyrah, we discussed many different game types from the at first confusing topic of "buying and selling", a trivia gameshow type-game was given by Eshan, but we couldn't find any "fun" way of implementing that as a game mechanic. Kyrah had a bomb escape game boards already made, I wanted to pursue that, but it felt a bit restricting and it wasn't going in any direction
We ended up going with my idea of an "escape island" game board, we danced around ideas of either an island or a post-apocalyptic wasteland, in which in both themes, the goal is to escape. The components are the different types of "cards" we had. We had "win condition" cards with requirements and criteria to complete. "Resource" cards that you could trade with. And then finally, the main way the game revolves around is the "Scenario" cards, it could be simple as going back or front a couple spaces, get x amount of cards, steal a card from someone, auto complete one win condition, etc.
The Mechanics in this game concept, players take turns rolling a 6 sided die, then move that many steps, land on either, "take resource card", "take scenario card", or a "trade zone". first two are straight forward, the trade zone, is where players must trade one card with one another.
The goal is escape the island or place. By completing 2 win condition cards, which results in the player having to travel to the start to escape. There were ideas of trying to find ways to make it interesting by having options for other players to stop or slow down a players progress, but due to our time constraints, we couldn't.
Simple game mechanic rules we had placed were, each player takes a turn rolling a die, then going that many spaces, do what the thing says, then finish your turn and let the player do his turn.
Overall, this small workshop was a great test of creativity, teamwork, wit, and how well you can manage under stress. I found it intriguing and very useful, as I can comfortably say that I would know how the average team settings would be
.png)
.png)
Here is what we came up with the 1 hour we had...
DDS 8: A Place Called Home
Intro to Construct 3
4th Dec MM XX III
In this lesson we were taught the essentials and basics of Construct 3.
(Click for full preview of each image).
I have had previous experience with game engines before, mostly messing around with what tools and stuff I can make. Gdevelop being one game engine I used the most out of the many engines I tried out. From the screenshots, Construct 3 looked familiar with the way the coding works, as it is a visual scripting language. So I got a bit of a head start in being familiar with such program.
Basics of Construct 3 include:
- Project: This includes everything when your making the game, it holds the layouts, event sheets, and other resources that are held within the game or app you would be making
- Layout: It is the holder for all the objects and sprites that appear on the screen, and each layout has an associated event sheet that defines how the layout works
- Event Sheet: This is the hidden backbones that holds almost all the coding and variables that will be used for the layout to function, and more importantly, the game to function.
- Properties: It is the attributes of an object, like how fast it moves, whether it is solid or not, or if it is set to be invisible when the game starts.
- Layers: Similar to how it works other apps and creative programs like Adobe products, it organises which layers are put on top in order. This is helpful for when making UI elements like a health bar, stamina bar, how much "x" of collectables you gathered, etc.

To get started, we must first be able to create a new project. Creating a project is simple. To create a Project, select the new button with your cursor. This opens up a panel, with different properties and traits that must be edited or chosen before starting a new project.

For "Project Name", it is the name of the Construct project file, which doesn't matter, as you can easily rename the project file when exporting later on. "Project Pre-set" is the resolution and orientation of the aspect ratio, 16:9 is the default as majority of monitors and devices are made to be 16:9. However other aspect ratios are plausible, like 4:3, which gives a more compact space, or 9:16, which is suited for mobile games.
Depending on the type of art style, optimising for pixel art does a couple things. From the "Construct 3" website, the manual lists: "Pixel Rounding" which doesn't blur and makes sure that the alignment of pixels is crisp. "Letterbox Integer Scale Fullscreen Mode" which maintains pixel-perfect scaling at integer zoom levels (e.g., 1x, 2x, 3x). "Low Fullscreen Quality" Tries to ensure and maintain the pixelated aesthetic. And "Nearest Sampling" which in a round about way, the sharpness of pixel art is retained.
One important titbit to know before moving on, is about "Objects". The one crucial thing to know about Construct 3 is that majority of items and pieces (excluding the Event Sheet), are made with objects. Objects are the fundamental bricks and slabs of a project. Like Lego®, they can be simple text objects, they can be sprites, fundamental objects like keyboard, mouse, gamepad input, and way more to list.
Moving on, we were told to make our first "sprite", a sprite plays a crucial role in almost all construct projects, it is an animatable image that appears in the project(s) that you would be working on. Its purpose is to create visual elements such as the player character, enemies, projectiles, and so on...
A sprite can have a still image, more appropriate for menu buttons. Or sets of animations that can be tweaked with the coding assigned from the events sheet. These "Animations" can then have names assigned like, "walking", "idle", "attacking", and etc. Where if the player or NPC(s), are doing such actions, the coding in the event sheets can assign it to that specific animation.
There's also the "Initial Animation" which is the default animation you set for the sprite to be, but this can set or done with the "event sheet", by having it as when the player isn't doing anything, (checking for player movements, and any button presses, which to then start playing the "Idle" animation from the beginning)

Here is the Sprite editor, it is very bare bones, and lacks some much appreciated quality of life features, but works for the most part to churn out quick and ruff sprites, which is good for grey box testing. (Grey box testing in short is when the game is being tested on its gameplay mechanics without any or most of the art/sound assets being worked on or finalised).
I made a knight reminiscent of a game I played earlier in the week, "Castle Crashers", it was easy to emulate the art style as it is the embodiment of a "Flash-era" type of game.
I also made an Idle Animation quite quickly. By duplicating the frame and then moving the top body of the character down, to mimic an "idle" pose. To have the animation looping, you got to have "Loop" Enabled. Otherwise the animation will end at the last frame, making it static. I went ahead and named this "P_idle", and will make running and jumping animations later, but that's for later.

Moving on, we then added a "behaviour", which was added on our character's sprite. The behaviour we gave it, is the Platformer behaviour. This allows for basic movement functionality, moving left, right and jumping up. The arrow keys to move were the default key binds set. And in order to change the key binds for it, we swiftly learnt what the event sheets were. Simple Conditions, in which, if player is pressing the "D" key, the action should be the player simulating the platform behaviour "right", and so on. I later learnt in the lesson about "inverted" conditions, where if the player, isn't doing a condition, then the action can occur. I could have made it so, if player is pressing "A" key, and not pressing "D" key, perform "Left" platformer behaviour. But I will save that for my next game projects.

Testing the game using the "Preview" button, our character falls into the abyss, which prompted us back at the layout screen. To help our character stay afloat, we added our second sprite, a basic ground platform. The "ground" sprite was used as our floor for our player to waddle around on. We then added a behaviour to our floor called "Solid", which makes the sprite interactable, by being a physical object that can't overlap with other "solid" sprites and objects.

A "game" is now "technically" created. As the player sprite is now no longer falling through the platform, and can physically walk across the floor with no issue. However when moving the character, the camera does not follow the player. This is fixed with the "ScrollTo Behaviour", this makes it so that the camera moves its position with the player, (when enabled).

The next thing we added, was a tile-background, it has similar properties to a sprite, but with the added bonus that the image can be repeated in patterns, good for making backgrounds. And as well as for more complex use cases, making effects, and cool imagery. But this is for later. I was thinking of the old Zelda games when making the background, dungeon/cave diving sort of theme.
Now onto variables! Which store data, there are a couple different types of these variables in Construct 3.
- Instance Variables - This only applies to one object types with the help of the "Object Instance Variables dialog". The initial values can be set from the properties bar, and then changed with the Events Sheet. Good for storing simple values, like "is player shooting", which is called a "Boolean" variable, or storing the players health with a number value. If your making a multiplayer a game, and need to individually record each player's score. Instance Variables are good for that reason.
- Global Variables - This applies to the entire project, which is useful when making multiple event sheets, or you need to track something across multiple layouts. These are number or text values, that can be set and edited with the events sheet. You can retrieve them by simply using their name in expressions Good for tracking collectables, the timer, certain events (like if player activated or completed x to unlock y).
- Local Variables - Similar to Global, but only applies to one section of the code. This happens when you add a global variable in a group, and will make it so that the local variable can only be used in that specific group.
- System Expressions - These are way more complex variables that weren't taught in class, but good to know as I was reading through the Website's manual. It states that, these are built-in expressions that can be used to perform common mathematical operations. They can be listed with descriptions in the System Expressions section of the manual. The operations that are most common are adding, subtracting, multiplying, and dividing. They can also be used to perform more complex operations, such as calculating the distance between two points, or finding the angle between two points.


We made two Global Variables, and one Instance Variables. In short, the Global Variable stores data, and stays on the top of Event Sheets, or can be grouped and become "Local Variables", and the Instance Variable also stores data, and is assigned to an object sprite.
After learning what Variables were, we started working on Collectables. Simple coins, trinkets, gems, etc. for the player to be incentivised to collect. For score, used as currency, or just for collecting, it is important that we know how variables work to start working on "Collectables" and what-not.
Using the Sprite Editor I made this "dabloon", and did the same techniques with the "Knight" sprite object in making the animation loop. Very simple, and bright so that it attracts the player to go ahead and pick it up. I gave it a black outline as that is the current "art style" that I have made on the spot.

I sprinkled the "dabloons" akin to how I have seen coins placed in the various platformer games that I have seen and studied like the original Rayman games, and the old Super Mario Bros. Platformer games. I also made a wooden crate to mix up the scenery and add a bit of depth, as generic brown wasn't enough for me. Overall, I was liking the progress in learning and understanding of concepts, systems and how the engine works so far at this point in my journey of Construct 3.
Right now the collectables don't work, as we haven't assigned anything to show that the player has collected, and no data assigned to show how much we have collected. I made a new global variable, and named the score "Dabloons", and set it to "0" as in zero. As the player hasn't collected any of the collectables at the start of the game. This Score will store the data of how much "Dabloons" the player has accumulated. We will also need to make a text box to store this score into, which is easy to do, right click on the layout, click on "insert new object", then scrolling down to find "Text". Make sure to have the box big enough to store the text that will be inputted with various codes in the Event Sheets.


Here is the visual coding I did, by copying the example shown in class, The first line, the condition is that, if the player is collision with the coin. The action should be that it should destroy the coin, then add one unit to the "Dabloons" global variable.
Then the next line of code, is that the condition: every tick, basically checking every frame, which is a "nothing condition" (Not requiring anything to perform the action). In which the action is to the set the text as " "Dabloons:"&Dabloons ", the reason to put the "Ampersand" sign, is that its the global variable storing the numerical value of the amount collected by the player.

To make the text follow the camera, like how the "ScrollTo" Behaviour works, we had to make a new layer, where the Parallax, under the "Scroll and Zoom" settings tab was set to "0%" by "0%", so that it was permanently stuck following the camera.
The layers present here work like how it would in any other creative software. The option to lock, so that you can stop accidently clicking on the Tiled background, and click on the small sprites. And the option to have them visible or not when working on a game. I proceeded to add a lot of layers that I tried to guess on what we would be working on in these few beginner sessions of Construct 3.
Overall, I really enjoyed my time using Construct 3, I have already technically used this engine in the past, the older version Construct 2, I didn't really made games in it before, just small sample tests. This lesson was more of a recounting of old, vague abridgments from which I slowly caught up to pace with the rest of my peers with astonishment.
BIBLIOGRAPHY
Scirra Ltd. (2023). CONSTRUCT 3 MANUAL: CONSTRUCT'S INTERFACE. [Online]. Construct. Last Updated: December 2023. Available at: https://www.construct.net/en/make-games/manuals/construct-3/overview/the-interface [Accessed 4 December 2023].
Scirra Ltd. (2023). CONSTRUCT 3 MANUAL: PROJECT STRUCTURE. [Online]. Construct. Last Updated: December 2023. Available at: https://www.construct.net/en/make-games/manuals/construct-3/overview/project-structure [Accessed 4 December 2023].
Scirra Ltd. (2023). CONSTRUCT 3 MANUAL: PROJECTS. [Online]. Construct. Last Updated: December 2023. Available at: https://www.construct.net/en/make-games/manuals/construct-3/project-primitives/projects [Accessed 4 December 2023].
Scirra Ltd. (2023). CONSTRUCT 3 MANUAL: THE NEW PROJECT DIALOG. [Online]. Construct. Last Updated: December 2023. Available at: https://www.construct.net/en/make-games/manuals/construct-3/interface/dialogs/new-project [Accessed 4 December 2023].
Scirra Ltd. (2023). CONSTRUCT 3 MANUAL: SYSTEM EXPRESSIONS. [Online]. Construct. Last Updated: December 2023. Available at: https://www.construct.net/en/make-games/manuals/construct-3/system-reference/system-expressions [Accessed 4 December 2023].
The Behemoth. (2008) Castle Crashers. [Video game]. The Behemoth. Microsoft Game Studios. Sony Computer Entertainment.
Continuation of Construct 3
5th Dec MM XX III
In todays lesson, we continued learning more about Construct 3 and its many features. This session was more focused on enemy AI, Grouping, Health Bars, Audio, and then finally publishing it.
Hazards/Enemy AI
Most Games feature two types of obstacles for the players, static blockers, like spikes, bottomless pits, lava lakes, etc. And moving blockers, which are your Goombas, Bokoblins, blaster projectiles, etc. Obviously there are way more variations, but these are the majority of blockers that appear in the game.

I drew a Gerbera Daisy, a popular flower used for floral arrangements. I was going to originally use it as a "collectable" for the player, but since the Crusaders are cartoonishly evil. They hurt the Knight here, for comedic purposes of course.
Now after making our "death" trap for the player to dodge, and platform around it. We needed a way to implement a way for the player to get hurt and sustain damage.


This is where we needed to implemented an "instance variable" onto the player. And I abruptly named it "PlayerHealth". But this isn't enough, as now we need code for whenever the player touches the "flower", and then for the player to lose health, to then have it so he reaches 0 or below health, player goes bye bye.
Here I wrote code for when the player touches or interacts with the flower, he loses about "25" value from the instance variable "PlayerHealth". And then, when he reaches 0 or below health value, the layout resets. I tried to implement a way for the player to be flashing in and out, but couldn't find the time nor knowledge to do so. Other than that, I like the way it works, but now theres a problem with how the collisions are working.

Apparently, I set the collisions to have it so where it wraps around the asset, which is bad !!! As it will be a bad experience for the player and lead to many many inconsistencies, with how the player would and will interact with the game.
The collisions have to be solid square objects. As it makes it easier for platforming. The origin point has to be set in the middle bottom as well, as to not mess around with how objects and code interweave. And then when everything "hopefully" works as intended, it won't be due to these issues.

We now need something to show and visualise that the player has taken damage. I made a red box, with a musturd yellow colour forming a sort of "cross", to resemble a flag of some sorts. And then it needed to be stretched out to fill a space in the top left of the player's UI.
The coding for the visual health bar is fairly simple. Every tick, set the width of the sprite object equal to how much player health there is. This is simpler and easier to manage, as manually setting the health bar for every instance the player gets hit becomes spaghetti code. This approach is easier as it wraps neatly everything by checking for the player's instance value. And then changing if needed so.

The "game" build is slowly showing through, as I can make a simple short platformer with only these objects and sprites needed. But something is missing. As after completing the framework for how the health systems and getting hit works. We move onto Enemy, and making simple Artificial Intelligence (A.I. for short).


We were told to make quick enemy art, which I got the idea to base it off characters from the live action adaption of "Diary of a Wimpy Kid". But, slowly drawing the cartoon figure, it resembled my friend sorta. And I made a second variation re-skin, to spice up the atmosphere in the game. Which I just leaned into it for laughs.

Drawing was the easy part. Just plopping it into the "Layout" won't do anything, so now it was time to implement code and behaviours onto the sprite objects. Which is surprisingly easy to do so. We can use the same "platformer" behaviours we have on the player sprite, and removing the default controls. And also giving it the "Solid" Behaviour, just like the majority of the object sprites in this game, as to not have the object sprite just fall through the floor.

Here we can tinker the speed, velocity and whatnot on how the enemy AI moves and interacts with the game environment. This is nothing special, as the enemy A.I. can't move as it is not given a purpose, or rather, no code for it use for moving. Which is where we need to code special "movement" blocks.

These attention deficit, brightly coded blocks will be the "signal" for which to point and tell what the enemy A.I. should do when it interacts with it. However, this will need to be coded, as simply overlapping with the sprite block objects is not enough. The Enemy A.I. will need new "Instance Variables", which I made two of: "Right" and "Left".
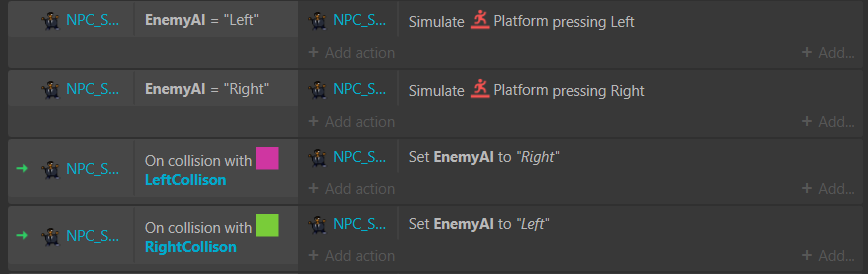
The code on the left show cases the simple coding I did for when the Enemy sprites do interact with the blocks. When EnemyAI = "Left", simulate the "platformer" behaviour pressing left, and vice versa for the right. And then right below it, is for when the Enemy A.I. is on collision with the "Left/Right Collision", which sets up the EnemyAI instance variables.
Timer and associated code
Now the game needs a timer, in which it is an in game clock ticking down. Which upon the timer hitting zero, resets the layout to the start. As some type of games require there to have a timer for the player to get as quickly to the end of a level or game, so the player isn't meandering around and has to be on the move constantly.

Here's the code for how the timer works. Every tick, the timer text updates its text constantly on the global variable of the "LevelTimer", which is the value how much time there is currently in the game. Then every "1.0" seconds, the value of the "LevelTimer" goes down by one. But then it does nothing, which is why additional code is needed to tell the game what to do when the clock hits zero or below. Which is to add the condition of that, and to make the action, "restart layout" and "reset global variables", as they are both separate independent values.

And I added some collectable "stopwatches" for the player to collect and increase their time spent alive, which is sprinkled throughout the level. Using similar code structure to how the "dabloon" work, instead of adding to the amount of "Dabloons" the player swash-buckled. It adds onto the "LevelTimer" global variable. Which is presented in the game as just simply "Time"
Overall it is pretty simple to execute, as a ticking timer doesn't require much effort, but its use cases can be many. Like having a timer for special attacks, which have a long cooldown but can be lowered by collectables or attacking enemies with normal attacks to also lower the cooldown. Which is useful for my future game projects on which I might add this onto.
Sound Effects
Every game has sound effects and music to go along with it. So I added some SFX for the when the player is walking, and when he dies.

To add sounds, you scroll in the project files until you reach the sounds folder, where you import your mp3s or wavs. But before that, you got to add the object type "Audio" into your layouts, as to repeat from a bit ago. Everything requires Objects, or game won't work.

After importing my two sounds, where I forgot to trim it down, whoops. I wrote the code where if the player is moving, and make it happen once. It plays the "footsteps" SFX, and I gave it the tag "walking". And when the player isn't moving, it stops the sound from playing instantly. For death, plays the "paper_smack" SFX.
This was simple to do, and you can do many other things, setting the sounds at different decibel points, have it so it increases in volume when going to a specific object, and go away in decibels when you go away from it. Good for making atmosphere and other creative uses.
Grouping and other miscellaneous stuff.
We were then taught to learn how to organise our code, by grouping them of course! As soon we will be working in group projects, and when multiple people are working on the code and on the game, you don't want people completely lost trying to untangle the mishmash of discord that you wrote yourself. And it is the same from the other way round, as trying to figure out where anything is on the event sheet(s) that was made by your class mate will be a difficult experience.

Here is how I organised my code. Movement, basically mapping the buttons onto the player, and assigning platform behaviour for it. UI, is the visual stuff on the screen for the player to gawk at, and includes the collectables as it was just two lines of code. Health_Player has the health, and getting hit in it. Timer is for the other collectables, being the clocks to increase the timer you have, and if the timer goes down, restart the level. NPCs, includes the enemy A.I. systems, the flower obstacle, and collisions. SFX is the sounds that occur in the level. And then the big Animation group.

I did the painful way of implementing the animation, as I for some reason made variations for a lot of combinations of key inputs the player could make, but I could have grouped and broken this part of the code down.
I could have easily have it so, where if player is moving, then if holding down "A", play the running animation. Then back to if player is moving, if player is holding down "D", play the flipped running animation. And add a condition for if the player isn't jumping or not in the air, this would have cut down the code in half at the very least.
And now we are getting close to the end of making this short game project. Which is now for publishing it. The game didn't have a title screen, so I quickly work shopped one within a minute.

I also quickly made up a fake RPG name that would sound like a 80 hour epic. "Crusader's Quest: Fall of Babylon". The Babylon part I took from the recently released, and recently defunct Square Enix title; "Babylon's Fall".
Making the title screen, involved creating a new event sheet and layout to go with it. Which I learnt you can link multiple event sheets together, which is useful for separating massive systems to then easily link it a layout. But for this, it wasn't needed.

I added a new object, the "mouse" object. And with this, I wanted to implement a gimmick from one of my own older, self made projects I made in my spare time. Where when you hover over certain icons, texts, or interactable text, the colour of it changes slightly, or it lights up.

Here I am hovering over the "play" button, where it lights up into a bright white. This was beyond easy to implement, as all I had to do was to make two different variations of the "play" sprite icon for the title screen.

(*Difficult to show mouse while screenshotting, but the mouse is indeed hovering over the "play button"). Here the mouse is hovering over the play button, which I made it a quirky mustard yellow and deep navy blue combo, as I looked a colour wheel and picked these at random.
Now when the game loads, the player has to make the instinct move to press the start button and press play.
Overall, these past few days of learning construct were fun, I have learnt and gathered so much information, technical "know-how", and overall useful titbits. It was also challenging, less about wrapping my head around concepts, but more about mistaking what systems and different behaviours can actually do. As I just learnt what "Objects" actually do. I am excited for what is to come later, this experience was good for me and I will use it for my future endeavours.
BIBLIOGRAPHY
Freudenthal, T. (2010) Diary of a Wimpy Kid. [Film] Hollywood: 20th Century Fox
PlatinumGames. (2022) Babylon's Fall. [Video game]. Square Enix.
SPiArts. (2020) Green Square. [Video game]. SPiArts. Itch corp. Itch.io
Quick Construct Game Proj.
DDS 9 - Planning for a Game Project
7th Dec MM XX III
Visual Experimentation with PyxelEdit
For today, our lesson objectives were to first Develop the technical knowledge for designing 2D game visuals. And then to consider the opportunities for visual development on your team project.
We have completed various forms of artwork so far throughout the year, which helps our artistic ability as well as multiple design opportunities. But since were working within the restrictions of a game, we are going to need to learn how to make pixel art.
Pixel art, is a type of digital art. On which it is edited at the pixel level. Various different graphic applications have been made to support or only have pixel art capabilities as its main feature. As almost majority of drawing applications are at base, made with pixels.
PyxelEdit is one such application for making Pixel art. From its website: "It is a pixel art editor designed to make it fun and easy to make tile sets, levels and animations."

To get started, we must first make a new file, in which it can be done with: "File > New". And from there, PyxelEdit Documents can be set up in two ways; either a single image, or with multiple tiles. As Construct 3 can support multiple tile functionality, for both its animation(s), and Tile Asset(s). But for now, a single document is preferable. Setting the number of "tiles wide and high" to 1, as that would make it a repeated instance of 1 image. And for this exercise, 48 pixel Width and 80 pixel Height.

Here, we are presented with a plethora of options and buttons to push. The tool bar being on the left most panel, you got the bog standard tools like the Pen, Eraser, Rectangle, Bucket, Colour Picker, Zoom tools. Hovering over them gives you the shortcut bind to quickly switch to them, as well as a short detailed explanation as to what it does.
The canvas in the middle is your area to use those tools onto it, it works the same way as any other program with a "canvas", "timeline" or "playground" area.
On the right hand side, there are multiple stacks of windows to use.
- The preview window
- It is to showcase the art as how it would be viewed (incase if you are zoomed up editing bit by bit.
- The palette
- It lets you select colours from either your history or a saved colour palette.
- Layers
- Like any other drawing, or image composition application, the layer lets you stack multiple drawings on top of one another. Good for individually tweaking parts of an image.

Our task was to choose with any of the following characters presented, and try to get their likeness and/or image with their characteristics simplified in pixels.

I chose the second guy from the line-up of characters. I liked his mysterious aura and mystique, gone through many "character developments", and probably has a very sad backstory. Also I like the colour green.
Here is the two first versions I worked on at first, the first one was closer to his charm, but I didn't like how "scuffed" it looked. But then I worked on a simpler version, but I also didn't like this version. As I felt like I reduced his whole characteristics to below the bare essentials. Which I scratched both of these versions, and started working on a new version.

Here is the final version of the drawing of this exercise I did.
It was hard for the facial hair to look normal, so I went for a "younger" version of him. Before all the trauma and "character development" he went through. I kept the cape, the arm band bandage, the trinket(s) on his belt and whatnot. I originally went for black outlines, but I thought it looked "odd", so I coloured the outlines with the darker colours from the base colours of its originating colours.
I could have stuck harder to the source material more, but I instead, "iterated" on it instead.
Overall, I liked this exercise in preparing me to use pixel art for my game production and future endeavours. As the process of pixel art is to simplify and get the bare essentials of a characters design, to then have it still be presentable in a pixelated form.
As for our group projects, we still haven't decided on whether or not to use PyxelEdit to make art assets for our game. As we just started the Pre- Production phase. And there are a lot of valuable features here that some other "pixel-based" art software(s) sort of don't have and/or have a different version of.
BIBLIOGRAPHY
Daniel Kvarfordt. (2023). AboutPyxel Edit. [Online]. Pyxel Edit. Last Updated: December 2023. Available at: https://www.pyxeledit.com/about.php [Accessed 10 December 2023].
Starting our group project
WEEK I: PRE-PRODUCTION
TUESDAY 12th Dec MM XX III
This is my first serious group project that will take over a month to work on. In my group, I have myself, Dequan, Eshan, and Vraj. I already had written and wrote about a small game idea, as it was given as homework. A level based auto runner, escaping a facility of some kind. With the blockers being theming coded, as the tech inspired blockers are more projectile weapon based, meanwhile the mutated plants were melee or close ranged based. The power ups were gained by collecting enough of an orb, as well as for the advanced movement tech requiring a different kind of orb.
The group liked my idea, but wasn't too keen on the "auto running" aspect, as we added onto the concept and each team member brainstormed different branching ideas. I came up with a movement platformer, that's an auto runner, but can control the jumping, dodging, sliding, vine/grapple swinging. Three different types of blockers that's in the way of the player: non hazardous obstacles, like walls, crates, platforms and so on. Second type of blocker being projectile based, and the third type being melee based.
And after a couple minutes, the group chose the best ideas and mechanics from everyone's brainstorming sessions, and removed or changed a lot that wouldn't work as well
After laying the foundations of what our game could end up like, we were given a criteria list of requirements that the project must fulfil. It must obviously be done in Construct 3, theming is "Elements", and that can be taken in any way or shape or form. Must either be a platformer, adventure, puzzle, or shooter, or even combinations of two or more genres. Starting from today, the deadline is the 5th of February MMXXIV. Which gives the team 5 and a half weeks to prepare, make, write, code, script, design, playtest, and finish the game.
As a team, we thought we didn't need to change our initial theme and design of what we originally made. As we went for a action-platformer hybrid, with an emphasis on player movement. So we went on and each of us made a mood board of ideas, how the player will look like, possible power ups, enemy design, how the background will look like.
GAME DESIGN DOCUMENT (GDD)
Our next task we did was to then make our game's GDD. But most importantly, what is a GDD?
Every game, (well most competently made games), even bad ones like Redfall, got their own GDD document, which stands for "Game Design Document". It is basically your game's bible; it includes everything your game has, had, and will have. It includes the premise of the game, story, characters, mechanics, abilities, art direction, level layout, sfx description, and so much more.
The scope of the game also effects how long and detailed the GDD will be, and obviously we are not going for an ambitious project. A simple side scroller game, that is an action/platformer, with an emphasis on dodging obstacles rather than fighting them head on. At expected, the amount of pages will probably be about 8 pages at the very maximum. Since we only have 2 months to do this project, we should not bite more than we can chew...

And in the case we have plenty of time left over, we could start developing a second mode to compliment the main game. A 2-player mode, that would be an endless runner in which both players would have to compete who would get the most score or who would last the longest.
When writing the GDD, our group took the most liked parts from the brainstorming session we did on our PowerPoints, and inserted into the GDD. Then we expanded upon the document, adding information, and in detail about how the systems we use will be planned.
One small noteworthy side point I want to mention, is what "mood" or "art style" I want the game to be, and if my team members like or prefer it or not at all. I want the game as a whole to closely resemble the Early 2010s flash games that people would play in the Computer room in class when they were supposed to be doing work instead. Games like the Madness series. But less gory and more minimalist like Canabalt. Striking a balance between cartoony and sleekness.
Overall, we know what type of game we want to make for our group project. This was a good productive first day in planning, sketching and most important of all! Communicating what we want with each other. We know our strengths and weaknesses, as we are mostly coders, with no one particularly confident with art skills. This project will test our skills in how we handle all the problems we will face together as a team.
THURSDAY 14th Dec MM XX III
Today was to prototype a grey box from what we wrote in our GDDs. And then also set our selves goals for this week, next week, and when to start our production week at the earliest.
We quickly made a new Construct file, appropriately named it "Joyride Rip", and made a sketch of a stick figure, as placeholder. And in this Greybox, we messed around with various values of how fast and slow the character should be. Are we aiming for a fast platformer? Slow and methodical? Or a sweet spot in the middle. Nothing was sparking inspiration as to how I, or my team would evaluate this, but when I left the directional movement as is, and started to work on a "Slide" mechanic I remembered from playing the Mega Man series.
Why do I think my game NEEDS a slide, well to have a unique and fun gimmick to stand out from other games, as then, when making levels, we can use this mechanic for both offensive capabilities, and for using it to for exploration. Like going under 1 block tall tunnels, breaking destructible objects in our way, and so on.

Another quick sketch of how he will appear as placeholder, but I still needed to code the actual mechanics and systems in place for it. Which I learnt by using a tutorial I found on YouTube.

First a button prompt is needed to start the "slide" mechanic. Space bar is convenient, as we can then put our other abilities and power ups above it (the z, x and c keys). Then to make it more than a versatile verb, we made it if the player is holding the left or right arrow key. So that is required to be moving to slide, as a stationary slide in theory feel a bit slow and odd. Then Two Global Variables are needed to be made, "candash" and "dashing". Which are used to check if the player can slide, is sliding, or can't slide until cooldown is finished.
This way, we can easily manipulate the timings for how long the wait time for the cooldown between dashes is, and how long the player can and is dashing for. Fine tuning the timings is crucial for how fun the movement would feel. As too long a cooldown, the player might get bored. Too short a cooldown? The player can speed through the level without feeling challenged one bit. It is the middle ground our team would want for the "feeling" of the game.
Moving on, the condition required is if player is equal or above one health point, is on the floor, which our team wants to remove, as the gravity will pull down the player regardless, but I was fighting for it be that way, as multiple new breaking bugs and glitches can be found if the player can just freely in the air. Then if the global variable "candash" is set as "True", and two extra conditions on whether or not if there's a wall next to the player on his right or left, as to not clip through walls and platforms.

Then the action that will happen if all the above conditions are met, is that then, player is set mirrored, "candash" is set to False, and "dashing" is set to True. A new behaviour is given to the player, the "bullet" behaviour, and in the name, the object would act like a bullet, travelling at a constant or accelerating/decelerating motion, which would be activated at a steady rate.
Then 2 different cool downs starts, "DashCoolDown" was set at 2 seconds, but that was incredibly short and bummed up to 5 seconds. And then "BulletTimer", how long the player is dashing for, set for 1 second. Playtesting showed it lasted too long, and was not intuitive, so set down to half a second. And then we duplicated this for whether or not the player is facing right or left, if right, angle of bullet will be 180 degrees. And if angle of bullet is left, it will be set to 0 degrees.
Direct Link/Preview
Overall, today was a really productive day, setting up the foundations for our game was fun. Especially setting up the slide mechanic, which I know we will use it for other uses than movement and feeling fun!
FRIDAY 15th Dec MM XX III
Today was to make a working menu and level select screen. As we discussed our game to be a level based platformer, and not an infinite runner. We also discussed in person if the player should immediately go to the next level, or have to manually select the levels.

I had a quick sketch of what I sort of was alluding to. The animations from increasing the text box and decreasing was difficult, so we opted for a more simpler, minimalist design. And we experimented and researched a couple free to use fonts that were royalty free.

We decided on two different fonts we were going to utilise, me and Eshan chose together, the default "Steiner" font for short, large words sentences, and then the bold version of "Hussar" for the smaller, descriptive texts we will use to give a small flavour text of each button prompt.


The game's theme and art style is something I haven't talked in detail about yet, so I am going to now. The specific reasoning as to why these fonts were chosen, is that I want the game to be more grounded, and have a "spy thriller" aesthetic, akin to how GoldenEye for the Nintendo 64 looks and feels. Or a more modern influence being the Metal Gear Solid games (not including Revengence).
So nailing this "vibe" the player will feel is crucial for an above average experience at the very least for players who would like that type of story and theming.
Moving on, I continued working on fine tuning the movement mechanics, over-iterating the speed and velocity at which the player moves at was a bit consuming of my time. As I let a classmate feel out the game for themselves, in which they said it was a bit slippery like ice. And "gotta go fast" was not the approach, as I slowed the overall movement by a third. And now it feels more modest, like you actually have control over the intricacy of how you are moving now.
END OF WEEK I REFLECTION
As our first week in game development in a team oriented setting, I'd say we are making extremely good time and progress. I didn't really set any goals, other than having a grey box prototype build of our game, and adding onto our GDD file that all members in the group have access to at any time.
What I want for next week is to have my classmates start working on concept art for enemies, player, background art. And small start on asset creation, whether it be objects, pickups, something small to base our art style on.
Here is the finalisation of the first few weeks of the Schedule that our team managed to make, and get together the "broad" strokes of what we would find as suitable to work on:
BIBLIOGRAPHY
Adam Saltsman / Danny Baranowsky (2009) Canabalt. [Video game]. Semi-Secret Software.
Rare. / Martin Hollis (1997) GoldenEye 007. [Video game]. Nintendo.
GameDev Journey. (2022). HOW TO MAKE A DASH MECHANIC IN CONSTRUCT 3 - EASY TUTORIAL. [Online]. YouTube. Last Updated: 20 Mar 2022. Available at: https://www.youtube.com/watch?v=UKFxb_Lt4Wc&ab_channel=GameDevJourney [Accessed 14 December 2023].
WEEK II: PRE-PRODUCTION
MONDAY 18th DEC MM XX III
Today was more chill and calm, as to catch up with everyone on what we did in our weekends, and what next to do based on our team schedules. We were more focused on concept art, or straight pixel art.
One thing we would definitely want to focus on is start implementing the "blockers" and enemies from the GDD document. I decided that, we would want two different type of blockers, one being projectile based, and the other being "melee" based. And going back to the "element(s)" theme we were given, I made it so that the different elements and "components", were naturally given their own "element" in the way of it being their "natural" thing. Tech/Robots/Ai was the projectile blocker, then Mutant Plant life being the more melee based blocker (and also natural obstacles, like platforms or tall walls being a sort of blocker, but its more of and environmental challenge.
Dequan made a cool pixel art plant monster, based on the Mutant Plant life inspiration. Which was from the mood board(s) on the google slides and its based on what was written on the GDD.
I took the base form, and then touched it up a bit. From then on, I animated it's idle animation using the Pyxel editing software. I really wanted its eyes to be closing vertically rather than normal-"ish" human way, but I couldn't get it right after a couple tries, so I stuck to the one I originally did.
I continued work on the code of when the player is contact with an enemy. And from the looks of it, I think I will be working on this for longer, as the player gets stuck on the wall collisions and I need a way to implement "flashing" and invulnerability frames.

Here in the code, it is very bare bones, I will set a reminder for tomorrow to work on this further. As in its current state, it doesn't do what I want it for it to work as.
Overall, a light start to the week, but I know were going to start ramping up the workload we will have in the next couple of days of "Pre-Production"
TUESDAY 19th DEC MM XX III
For todays agenda, I continued to work on the code for the collision between the player and the blockers and enemies that will be present during the game.

As for others, I know Eshan has been hard at working on some concepts for level design. Dequan is making some concept art for enemies. And Vraj is or about to finish making some Background Concept Art.
I gave some feedback onto the first iteration of the beginning levels that was made by Eshan. I liked the introduction of collectables and what not, but it is over demanding of the player in its current state as of now. But this is good for future use cases as to what to iterate and improve upon.


Here is the new and improved code for the collisions and for when the player gets hurt. I first did some "house-keeping*", I made use of the "Families" feature, where I can just easily associate tons of "Objects" to a "Family", have the blockers be in the "Enemies" family, the player(s) in the "PlayerEntities" family, and Breakable and Non-Breakable Platforms in their own seperate familie(s) to be called for reference easily in the future.
House-keeping: It is organising your files in an ordinary and formatted manner, as to not have clustered and messy file organisation. As to not affect your peers who might work with the same project files as you, and to not hurt your self in the process too.
But moving on, when the player is on collision with any enemy, health is one or more, isn't flashing, isn't dashing, nor is the "player sliding" animation playing. In which if all of these conditions are met. It gives the outcome of first, start ignoring the player user input, minus one health, set the instance variable "player hurt" to 1 second, set the other instance variable "KnockbackTimer" to "0.4" seconds. Set the "scrollTo" behaviour to "shake" of magnitude 10 for "0.15" seconds.
Then the important code that ties it all together, setting the vector of the "y-axis" to -150, bullet accel. of 3,000. And Deccel. to 300. Which gives the "knockback" effect of the player being physically hurt, and being bounced around. The mirror and not mirror one is for which direction the player is looking at.

As for how the player instance variables work, the "player hurt" is a continuous variable until it ends. Which subtracts from "dt", which stands for Delta Time. I do not understand what Delta Time completely is or about, but from some time reading the manual on the Construct website. Roughly, "it represents the change in time between consecutive frames. It measures the time elapsed since the last tick (frame update)." So it is based on changes in frame rate.
And after the "player hurt" instance variable is finished, it stops the flashing. Main reason for using dt for when the player gets hurt, is so that on slower, and older machines. When the player gets hurt, they have more of a chance to react and respond to their surroundings than if they were on a faster machine.
The crucial bandage that somehow makes the player being hurt work, is the instance variable "KnockBackTimer". This small, but invaluable part of the code, makes the player being thrown around after getting hurt actually work.
This was very difficult and time consuming to work on. As the slide mechanic I'm working on, and the laser bullet Vraj is currently working on are far from being perfect. I wanted to actually work on the "character-model/pixel-art" of the player character. But I will leave that for tomorrow.
THURSDAY 21st DEC MM XX III

Last week when deciding what pixel art software to use, we were about to go ahead and stick to Pyxel Art, as everyone in the group already had experience with using the software. But I was keen on using this free alternative. Piskel.
Piskel can be used online and offline in a web browser easily. On its website, "Piskel is a web-based tool that lets you create pixel art, game sprites and animated GIFs in your browser." With some disadvantages, as you can't rotate selections of an image in a 360-degree angle, but rather stuck to full 90- degree rotations only.

Similar to "PyxelEdit", it has similar tools and spaces. But this is better, as it feels more approachable and easy to work on quickly. As the restrictions could elevate the art we make on it to be better and high-quality. Rather than still trying to figure out how the more complex art software works.
On the left hand bar, the tool bar has features like the pen tool, eraser, fill, line, square, rectangle, select and so on.
On the right hand bar, there's the preview, being able to see it in different frame(s) per second(s). If your not working on an animation, setting it to 0 will make it only preview the current frame. The layers and onion skin options felt a tiny bit clunky at first, but I got used to it rather quickly than my peers.
What's sort of more nuanced with this art program is the colour paletter on the right hand bar. As I like being able to quickly make tons of different colour palettes and having them be listed differently, like one with "Gameboy" colours, one with "8-bit" colours, and so on.
And to save the project file, theres many ways to do so. I told everyone to either send their files as exported gif(s), or as the original "Piskel" file(s). Easy this was as to not get headaches.
Character Iterations/Animations

The whole "espionage" theme and influence(s) from various "Metal Gear Solid" games, led to the first iteration of the character being closely resembling of "Solid Snake".
The main feedback I got was how I would translate this into a moving and
breathing player who moves and jumps and slides. And when trying to imagine
how it would look, I couldn't see how it would translate well.
The second iteration of "Agent R." was now closer to what I actually wanted for the game. But it looked too "Cartoon-ish" and trying to be "serious" at the same time. I liked the shading and use of colour I did on this piece, however I felt it looked too "clean".
The feedback I got from my peers said that this looked good and well made, but
I didn't see it that way. As his shoulders were way too broad, and his hip
plus his legs too scrawny to look good either way.

Here is what I then started working on, a simplified version of a potential "Agent R.", the bright green camo shirt, sneakers, and brown hair wasn't adding up. So I iterated a bit, making him older, and more "tired". Giving him grey camo instead, a greyed out beard, and lots of grey on his head. Also removed the eyes to be replaced by "lines" instead, and this muted "look" was way better now.
A few touch-ups, by giving him a bullet-proof vest, making the jeans, not jeans by having them be generic cargo pants instead. And I did a quick animation of him being Idle by using the "Piskel" art software.
I then spotted, that his pants were a tad bit sagging, so I went ahead, and pushed them a bit up.
I continued working on different animations that would appear in the game. Which looked alright, his head might be a bit fat, but I kept that charm, as that is what I want to be unique from other character designs.
And I gave the idle animation more charm, the question mark at the end of the loop is the small homage and reference to "Solid snake".
Here is the "finished" animations for Agent R.
The "weird" jump animation is a reference to Mega Man, when he jumps and has his blaster arm ready and locked to be shot with. As we are implementing a "Laser" in which he blasts either from his arm or chest, so I kept this as is.
I also sped up the animation on the walk cycle, keeping the patterns on his arms were the most tedious and difficult part of making this animation. As with the limitation of not being able to freely move his hand at any rotation, I had to draw out each position as skeletons first. Then attaching limbs to the drawings. From then on, I polished it up.
Overall, a lot of work done on the character model, as that's what the player will be majorly controlling for the duration of the game. So it has to look at least a bit charming. The slide animation isn't done yet. And to decide who does it, I broke a stick into 4 parts. The one with the shortest stick had to do the slide animation. Which unfortunately was me. So that's hopefully going to be done by this or next week.
FRIDAY 22nd DEC MM XX III
For today, I started working on the level select menu and its associated code. As well as maybe iterating a bit on the overall "feel" and look of the menu(s).

Last Friday, I already worked on the most "fitting" font(s), and colour. But I was not feeling the green, so I went with a more "pastel orange", and added a "Guava-pink" description box to show text and tell the player what a particular menu item is, or give fun "lore" titbits that fill in on what the player has to do.
I also added helpful button prompts at the bottom of the screen. Using free assets given by Mental Checkpoint, who is a Youtuber, and Founder/CEO of "Those Awesome Guys", makers of "Move or Die"
More information in the video below:
Direct Link/Preview

The basic overview of how the menu works, is that, first it checks if any video is playing or not. As I want to be able to switch from the menu to the cutscenes. Then I made a Global Variable: "Select", a number from 0 to 3 in the start menu, and 0 to 7 in the level select. As when the player presses up, the number decreases, and if he presses down, the number increases.
And I made it so, if the number goes up or down a certain threshold. It loops back on the maximum and minimum value numbers that I restricted it to.
This is also when I started experimenting with "gamepad controls", basically being able to play with a controller, if the keyboard isn't to someone's preference. Adding analog input here was a bit difficult, so I stuck with simple d-pad movement for controlling the menu as of now.

There was many variations of how I would actually make the "cutscene" part of the game. As there were multiple avenues to do so. But after a couple days of going at it. I figured out that making a global variable where it sets "VideoPlaying" to true, pause any music playing in the background. Then disable the "ScrollTo" that I set on the Tilesets, from which I made a new object sprite, being a video. Where it loads the source of that particular cutscene, play it, and then set the "ScrollTo" to a simple sprite png of a "loading" text. Start the timer of how much long I know the cutscene is, and set a layer of opacity to be invisible.
Thinking about it now, I could have replaced the "VideoStart" Timer action to if the video ends on a seperate line of code instead. But this simplifies the process, rather than adding more code that is probably unstable.
Then the level select code for when the values are at a set amount is just to go to that level.

Here is the code that resets everything back to normal after a cutscene or video has concluded. One thing I wanted to add was the ability to skip cutscenes, but everything would get jumbled up. However the cutscenes that will and would be playing, are going to be short 15 to 30 second videos. So I am going to leave as is to save time and work on other parts of the game that needs working on.
END OF WEEK II REFLECTION
The game right now is slowly shaping up to be what our group actually wants the game to be. We still got lots of planning of systems to work on, as we are running a bit late on some workload. Especially on the concept art, I have tried to help manage the work a bit.
But I focused mainly on coding and improving how the game feels in its Grey box state. As if the game isn't fun just running around mindlessly, then there is still something greatly wrong with the "game-feel". So that will be our priority for next week.
Other than that, we need to also wrap up our pre-production work. And start going at our production work. Hopefully we can be ahead in that, regards to our schedule timeline.
BIBLIOGRAPHY
hideo kojima (1987-2015) Metal Gear Solid Franchise. [Video games]. Konami.
Mental Checkpoint. (2021). Why I'm Credited In Over 100 Games (not even joking). [Online]. YouTube. Last Updated: 15 Oct 2021 . Available at: https://youtu.be/d6GtGbI-now?si=Hx2LzBq9wbKHYORp [Accessed 22 December 2023].
WEEK III: END OF PRE-PRODUCTION
MONDAY 25th DEC MM XX III
This week is now, hopefully, the time to quickly end our design and planning stage. And to start working on creating content for our game.

With the character animations I did last week, I have now actually implemented that into the game. In which I quickly made the beginning parts of the level, that might end up in the beginning part(s) of the game.
The game still feeling sluggish, I got Vraj to help me out and tweak the number values of the platform behaviour. I also got outside player feedback by asking a couple of other group(s) to play the grey box in its current state. Most pointing to how sluggish and floaty it felt at times.

Instead of the "slippery" feeling that was given as feedback by my team members and some other class mates that did quick play sessions. The game now sort of feels "snappy" with its movement.

I took the time to write out and note how the mechanics were going to work out, in corelation for how the jumping works.
Three fundamentals were set in place, while working alongside the code, making sure it worked almost flawlessly.
- One/two block jumps
- The player must be able to jump easily one block with ease, And does not require long press of jump key to reach one block
- Three block jumps
- The player must be able to reach 3 blocks easily by holding the jump key. And must be able to half press the jump key from a previous platform of 1 to 2 block height difference, with a gap of 1 to 4 block height difference.
- Four block jumps
- The player should not be able to bypass, jump over, or proceed by this singular action of going past a 4 blocks or more. However, the player can and should be able to jump, proceed, and get past 4 blocks by utilising platforms, the combination of a jump key and then a slide key, or other means given in the level.
The Player can fully jump 5.5 blocks while holding the right key. And if the player SLIDES towards the middle of the jump, the Player can fully jump 7.5 to 9.5 blocks while holding the right key.
It was good to note down the intricacies of this behaviour and how it works fully as it is. Overall, it was quite difficult finding and striking the right balance between fast, slow and actually being fun to manoeuvre and platform around. But it still doesn't feel right somehow to me, and I will as is, as I spend too much time on polishing the movement already.
TUESDAY 26th DEC MM XX III
Short journal entry, as it was mindless debugging of the slide mechanic. As we ran into problems of the player character transposing into walls in some instances.
Then the collision with enemies not being set in place was a fun hour to waste on, as it was set to "guess" the collision box of the enemy rather than a simple square box.
In short, not much in terms of content and writing happened, as hours of time was spend on rechecking the code over and over, to then playtest in the "debug" player.
THURSDAY 28th DEC MM XX III
As the last day for Pre-Production before we wrap up for the holidays, and new year's. I wanted to work on something fun for once.
Ambient Music.
I think music will be an important factor in setting up the mood and intensity of the levels. But I want to go for is "procedural" music / background noise. As if the player is in the outside area like a forest, birds and tree noises would play. And slowly transition when the player is no longer near such areas, and smooth audio blend to a different area with its own associated sound-scape/track with it.
Implemented such an idea is difficult with the restraints given in the construct 3 engine when anything relating to sound is brought up. But I want to come back to this idea in one way or another soon.
In the mean time, I wanted to make some music to be played in the background. And to do this, we could either grab some royalty-free music tunes from the internet. Or I could make my own with the help of a digital audio workstation! (daw for short)
The program I have majorly used for music production in my free time to make and cook up musical beats, is a neat application called, "FL studio" developed by the Belgium company, Imagine-Line. There are other programs like Ableton Live, or Apple's Garage band. But due to my many years of experience and not wanting to re learn another program to ineffectively make music on, I will stick with FL studio.
Since FL studio is not a part of the course, I will be fairly brief with my explanation of what the program is and consists of, as it is a heavy program to get into.

On the left is The Browser, this is a library of folders and files that you can access items such as projects, samples, local and online content libraries, plus VST/AU plugins. And you are given a search bar to find and look for certain items
Then we have The Toolbar at the top, this area provides quick access to many useful options and commands that you change and customise to your liking. It provides quick links to go to other panels and windows, change the bpm of the song, record audio onto the playlist and so much more...
The main area that you will arrange all the recorded audio, and loops and patterns into is The Playlist. The Playlist sequences, meaning "plays" all the elements of the project, to produce the final song. This area also features subsets of windows, the playlist picker on the left side shows all the Patterns, Audio, then the Automation Clip manager
To then have the music and / or sound(s) play in the playlist, we got to utilise The Channel Rack for this, as the channel rack holds the instruements to make the neccesary sounds for the music. Then the patterns are used and made, as patterns have access to all the instruments, as they are not limited to one instrument. Then the step sequencer, a grid based sequencer, which is an easier way of making drum loops, and very, very simple melodies.
The mixer allows you to control the levels, applying effects on the sound/music playing, and adjust panning for individual sounds or groups of sounds within your project. It is quite important to mix and adjust how the sound is, because if the sound is peaking, the low end or high end don't fit, and many other problems. It is good to mix and match how it sounds at the end.
And lastly for now, we got The Piano Roll. Quite difficult to explain, but on the manual for the program on its website, "The Piano roll sends note and automation data to plugin instruments associated with the Piano roll's Channel. This process is known as 'sequencing'." As you play and input notes into the piano roll, which depending on the pitch, length and volume you played it as. Will be played as is. (Quick side note, you do not need a music keyboard in order to make notes on the piano roll, using the regular keyboard or using the mouse works as well!)
And thats the basic overview of how the program works!
I got inspired to make something that would appear in an "arabian bazaar" area, where the character might be trying to run throughout. And here's what I made in about 20 minutes of work, and 40 minutes of needlessly tweaking notes and knobs to perfect a couple sounds (if the music player does not load, press the button to open it in a new tab to be able to hear it):

This is how The Playlist looks. Its very basic and generic, however it does its job. So I accomplished my job today. And I can improve on it later during Production instead!
And furthermore, I want to be able to do that idea of "Ambient Music", could be hard or even difficult to do, but I could find a way to utilise "triggers" and what not to do so.
END OF WEEK III REFLECTION
As we come to an end of the Pre-Production phase, these past 3 weeks of game designing and planning, (and a lot of stress and pain), have been used extremely well for what we are creating.
Now we move onto Production, in these next few weeks, I expect our team to complete the level designs, have art work finished, most systems in place and working, more play testing, cutscenes to be worked on, and start working on sfx and music.
BIBLIOGRAPHY
Image Line Software. (2023). FL Studio 21 Reference Manual. [Online]. FL Studio Online Manual. Last Updated: December 2023. Available at: https://www.image-line.com/fl-studio-learning/fl-studio-online-manual/ [Accessed 28 December 2023].
WEEK IV: PRODUCTION
MONDAY 8th Jan MM XX IV
As the start of Production week begins, we discussed what we could and can do effectively with the given 3 weeks for production. Some of the items and parts of the game we discussed were: "Background Art, Object Art, UI Art, Cutscene Storyboard/Layout, System data for Levels, etc." Which we could do effectively within this week.

For starters, I wanted to make something for the player to break, as a way to challenge and have the player think! So I quickly made some crates with 3 variations to be placed throughout the level. And put them into a family system, and what immediately struck out to me was that I could have just made them one sprite, and then just have it be variations easily, but too late for that.

The bad code made here crudely is for when the player is sliding and on collision with the crate(s). It works, but the bandage solution that's highlighted, works half the time, and should be completely re worked upon. So that's going to be todays task for me, as to come up with a solution to have the player continue sliding while breaking blocks and sliding under tunnels.

For when the player is sliding, the code checks if there is the "platform" block above the player every tick, and if so, to continue sliding. But that has caused majority of the bugs and problems with the slide so far, and so, I scrapped and made it an invisible sprite instead. A "slide" block, when "On collision" with, (not "overlapping" as that would insanely make the speed of the slide absurd) it continues the slide until it doesn't have a slide block to keep colliding with.
I tested it out on this crude grey box level. And for the most part it actually somehow works!
The UI elements were looking sparse, and I wasn't bothered to draw a "re-fill" bar for the slide, so I made a circle that would fill up after being "used" and then go "empty" after the slide was used. And after deciding for how the player's "health bar" should be with our team. We went with simple 3 heart structure, and maybe a "shield" mechanic if possible. Where if a player gets hit, his shield goes down, and either it recharges slowly, or he has to go and pick up a shield on the floor to recharge it.
So that's going to be tomorrow's task, to implement the UI.
TUESDAY 9th Jan MM XX IV
On today's schedule, one of the things listed was the UI elements, so I started working on the, as that I planned to do today.
Dequan made this cool beating heart animation for the health. And I went ahead in making the necessary code to start implementing it in the game. First, I had to make a sprite for it, and then duplicated it twice for the moment where he had 2 hearts, and then the third one for when he was three hearts.

After making the sprite and inputting the animation(s), I applied the health bar on the UI layer of the level, from which I then assigned for each instance of each amount of hearts, if player has 1, 2, 3, or no hearts. It shows visibly on the UI that the player has those amount of hearts.
I had a small bug where the health bar would clip when trying to show no health remaining on the player, so I just set the health bar to be invisible instead, fixing the remaining issues.
I can reuse this simple code to showcase remaining shield or bullets, if we choose to work on them, as we did discuss as a group if would like to work on them.

Here's how it looks so far.
Today was also when I decided to finish the slide animation for the character.

I simply rotated the jump animation by 90 degrees and some minor tweaks, and the slide animation is complete, as its just one frame.
Overall today was a very productive day, and we were mentioned of a "game crit" that was happening on friday. Where every group's game is going to be play tested by each other group, and as a result, we are going to give feedback to one another on the state of how our game's are.
THURSDAY 11th Jan MM XX IV

Here is the level I have worked on for today, very basic. The turret at the start is just for testing how it works, as it was made by Dequan with the help of a tutorial.
I did the same thing I did last year in December, by having some class mates from other groups and teams to play test on this level. And I got some very valuable feedback, as the level felt too "hardcore" for some players. Which I found useful to fix for consideration next week.
FRIDAY 12th Jan MM XX IV
In today's lesson, our objectives was to understand the use of critique as a part of the iteration process in the game development. And that, we were set by ourselves to playtest each group members game.

I assigned myself to stay and oversee the feedback on our game. As my other team members went to see how the other group member's game's stater were. The feedback I collected was invaluable to make me see how others would react to their first time playing the game.
I quickly got a notebook with a pen to start jotting down the feedback. I set up three laptops, two of them connected with a controller, as the game has controller support, and one with a keyboard if the play tester felt inclined to prefer keyboard over controller. The first group that tested the game had generally positive feedback, but from what I was seeing in their gameplay, they were sort of stuck in the vertical tower part near the middle of the tutorial/grey box level. Which I promptly wrote it down.

Moreover, they had issues with the slide mechanic, they want it to be able to cancel the slide, and also do it in mid air. I just put their advice as "non mandatory", as I can definitely code with Vraj's help. Then the second group came in, one had issue with progressing at all, as they got stuck on the beginning cliff part, spamming the jump. And since this was a play-test, I could not help him. Which then I added "Have to show player can jump" on my notepad, as majority of players can progress easily, some will need help on how they can combine jump with platforms.
Another thing was how the enemies were placed, and how much it slowed down the gameplay for the player. As they one by one either defeated slowly each enemy blocker, or carefully platform around them. It also felt a bit cluttered from a spectators point of view, as the level design was cramped.
Second and third group had general sentiments, but with the third group, a game breaking bug was found. The slide when used a couple times, would just make you go across the level and glitch through objects, we didn't know the reasoning as to why it was happening. But we just wrote it down as priority to deal with next week.
Overall, I enjoyed today, being a different ordeal from what me and my group has been doing for the past few weeks. The play testing actually opened my eyes to how broken and badly designed my first iteration was, and I tried really hard to not speak up on how the game controls are "meant" to be played, but couldn't do so, as it would interfere with getting results.
END OF WEEK IV REFLECTION
I like the slide mechanic so far, I think it will still be worked on, same with the laser implemented by Vraj.
And I like the feedback our team got from the play testing session, definitely opened up my eyes and different solutions to the same problems I was facing before conducting such player feedback.
DDS 10 - Exploring the Development of Indie game LIMBO
WEEK V: PRODUCTION
MONDAY 15th Jan MM XX IV
Today was tasks and goals for this lesson and session was to now make art assets for the game, make it start to resemble how we planned the game to look like in the GDD, and our various mood boards and planning documents. While also slowly work to improve the game quality and feel that was plaguing the play testers experience during Friday's play test session that was conducted.

I added a new table and column to the GDD document that everyone can see. I am surprised that I didn't add this sooner earlier during the various Pre-Production weeks, but better late than never I suppose. Anyways, this is a simple short sentences with various objects to make sprites of. As we know what to add for our levels, and what we would decorate the overall game with. The difficult part was not over detailing the levels to begin with. As I wanted the first level to be really pretty and gorgeous, but "obsolete", as the further you went through the level, the more the cracks, intensity of how much of the mutant plant life has taken over, as well as the atmosphere in which it is presented in.
But due to scope and having to BE within reason of the time limit, we opted for a more easier approach. Making and drawing the sprites based on where it will be based on the level design. As the opening section being the entrance, the chairs, tables, and whatnot aren't that all "messy", and just looks a bit "ruff around the edges". Then having more plant infested sections towards the middle and the end of the level. Signalling strange things that have been occurring during the laboratory, or alluding towards stranger activities.
Dequan, Eshan and Vraj were working on making tons of sprite and background artwork. While I read through last week's feedback I wrote in more detail and scrutiny. Mostly pertaining towards the movement mechanics, the "slide" mechanic. Play testers enjoyed it, but didn't like how restricting it was.
First things first was the bug that was haunting me from Friday's play testing session. After strenuous testing, apparently the code on which the slide is utilising the "bullet" behaviour, if you spam the button for sliding, which is the space-bar a lot of times. The bullet velocity keeps getting added onto. This was hard to debug and replicate, but the intended solution was to just reset and apply a fixed bullet velocity value each time the player slides.

I realised I can have it so that the slide mechanic can be done in the air. Which I quickly implemented so, removing the requirement for directional input for it also. Which Instantly feels better than holding down two to three buttons to execute a simple action.
I also changed how the Cooldown system and animation works, mostly visually as I just needed to switch around when and where the cooldown line of codes activate. Vraj created a proper "Cooldown Bar" which replaces our old placeholder circle.
In addition to the cool down systems changing. From the feedback, I wanted more versatility with the slide than being used as an attack, movement option, and a slight increase in jump (for the people who know how to execute it properly). Which I added a prototype combo system to the game, a bit late in development to add new systems and mechanics to the game. But this will make the game more fun and enjoyable. As when the player defeats an enemy with a slide, they get their slide cooldown back. Which when level design is effective, placing multiple continuous streams of enemy blockers in a path to the end goal will make the game more "arcade-y".

Last Time I explained this mechanic was a month ago at the time of journaling this, so a refresher would be good. When Slide activates, it requires the global Boolean "candash" to be true. And when it succeeds in doing so, it makes "dashing" to be set to true, and "candash" to false. Which also activates two timers, "BulletTimer" and "DashCoolDown". "BulletTimer" is how long the player dashes for, which is set at "0.25" seconds. And "DashCoolDown" is how long the wait period is for each slide, which we made it 5 seconds.
And for this "Combo" system to work, I would need to rewrite some essential parts. So I added a third timer onto the player, "BulletAttackTimer", which is activated when the player defeats an enemy. This then pauses "BulletTimer", wait a couple milliseconds as to not have the code above prioritised over this global variable. Be able Dash again without waiting for the cooldown (the main action needed to work this Combo system). And also have the Cooldown animation be set to "CoolDownReady", as the player can dash again.

With a bit of spare time, I quickly adjusted the level design. Utilised lessons I learnt from my analysis of game tutorials in Unit 4. I extended the beginning part of the level to be a "hidden tutorial" of the movement mechanics, forcing the player to use and hold jump. Closed off areas in the tall part of the level where play testers would try and explore. Which I can still utilise and add easter eggs, text information which adds to the mystery and story for the players to discover.
And so, today was a very productive day in getting started on making art assets as I was watching over Eshan and Vraj make assets for the game that I will utilise within this week. As Vraj made the "power suit" variation for the player, meanwhile Eshan made tons of sprite art for environmental objects. Which I helped a bit wit.
TUESDAY 16th Jan MM XX IV
Todays goals and tasks was to continue our endeavours from yesterday. In which we continue making art assets, continue iterating on level design, and continue working on the combo system.
I had worked on my level design for so long, that I was slowly getting a bit tired and wanted to work on art design now. I wanted to make some easy repeating sprites for my game, like some grass or muddy grounds, but I thought you had to make them as "Tiled Backgrounds" and not as "Tiled Assets". At first, I didn't know how Tile assets worked in Construct 3, so a quick overview of the manual made it more comprehensible. It is a large grid map of sprites on a single, or multiple images. In which it splits the sprites into x by y squares or rectangles, if the game sprites are 8bit, they would be 8 by 8 assets. But since the game is in 32 by 32, we would set the default as 32 by 32 to cut it and have it appear clean.

This is what a Tilemap looks like, and I told Eshan the rest to use this as a way to export their assets, as its easy in the Construct editor to place them around, than have it as separate sprites and PNG(s), which would clog up the folders and amount of separate sprites there is in the files for the game.
As you can see when I was making generic "Laboratory" tiles for the game, I went a little overboard as to somehow fulfil every possible variation needed for the platforms. I looked at earlier games for inspiration, going back to Mega man always for inspiration. As the way the level tilesets are in those games are actually fairly simple and straightforward. I made variations for a single piece of it, end of a long line, middle of a sequence, a corner piece, etc. etc. Then I made a simple ground texture, which has grass and some dirt associated with it. And simple strands of blades of grass, with a dandelion version to make some pleasing art assets.

Here is what it looks like. I made a new layer "Art Tile sets", which will be different from the "Art Assets" Layer. This distinction will make it easy to differentiate to other people who are working on the game as well. I think it is good that we are taking time to organise our assets, codes, and different systems into separate folders. As when towards the end of production, it will be difficult to navigate effectively, which will definitely add onto the stress.
I also lessened the amount of different types of rooms, background art, and tile sets we got to make for our 3 levels. As visually amazing it would be, we have to also utilise the time that we could be having for the systems that I want to work on.

Here's how the Level looks with and without the "Art Tilesets" layer. Originally, the platform tile was going to be used as like a placholder asset, but the game grown larger since then, and now its going to be used as a block for solid objects. And art assets and tilesets will be placed on top of it.
I have made a fake platform for the player to traverse on. As to teach the player not to trust everything they see and feel. But got to apply a collision on the vent part as to not have the player go and stay there.
FRIDAY 19th Jan MM XX IV
In today's lesson, our objectives was to let other class mates play our game, and play test different games in the class room. I had let Vraj collect feedback for the majority, before coming in and helping collect the last bit of information and feedback by the last group.
The feedback was in comparsion from last weeks "Play Test" session was overall, more "nice" and less about the slide mechanic. There was still some issues that was had about it, but nothing game breaking thankfully.
The main issue at hand was to make controls easier for the player to navigate through. As no button prompts were the fault
END OF WEEK V REFLECTION
The amount of work, and game content we have made is admirable, but we have to ramp up production work, as one level isn't sufficable. Which I have given Vraj the work of making those two levels for the next week. But in terms of making art assets, Eshan has been doing great so far, Dequan has been good at giving input and giving good perspective on what to do things effectively.
As we got one and a half weeks before our game project is due, it be wise to cut some corners and finish off the major systems before we do anything extra.
So un-started parts of the game like the options/settings menu, collection menu, and cutscenes will need to take a back seat for now.
WEEK VI: PRODUCTION
MONDAY 22nd / TUESDAY 23rd Jan MM XX IV
I didn't do much in these two days, as I was managing the team and helping with bits and pieces of other's work. While working on fine tuning the levels in the game


Like with the pixel art here, I helped in managing a consistent point of view of the pixel art, helping tweak the colour and shape, as well as point towards the right direction in "how" they should look. By helping towards the iteration process, I made sure the art would look like its actual object.
Here's the background art that Vraj made, which goes really well with how I want the game to look. I even said to implement one of the buildings that looks very similar, but if I had a nickel for how many times I mentioned it, I would have two.

I also started working on a "combo meter", to visually show that you got your slide "recharge" back after hitting an enemy, and to incentivise getting "high" combos. But it didn't work out, so I just left as is. As I couldn't figure out a good solution to it.
So here's how the game looks with most of the assets combined, with the text still leftover from the old greybox version of how the level was going to be planned.
I also updated the "recharge" meter for the slide, made it a battery when it is ready to use, and it plays an "electric" version when it is being used. But I still kept the part of it where it is recharging, as the dimmed colours actually help in not making it a priority to the eye.
Overall, more planning happened today than actual content creation, as I wanted to start working on the audio part really soon. But delayed that for Thursday, as I had to clean a new set of visual bugs that came from trying to have the background not clip with the foreground
THURSDAY 25th Jan MM XX IV

Today, I finally got back into working on the music, as the placeholder music wasn't cutting it.
When making this track, the instruements here, I got "Stardew Valley" vibes, so I leaned into that area and terrority for the main menu.
Here's how the playlist for the song looks:
And here's the media player for the song:
FRIDAY 26th Jan MM XX IV
Today was crit day, which means everyone's games get peer reviewed and play tested by other group members.
END OF WEEK VI REFLECTION
We got a couple more days till the end of our game production. And the amount of work that we did during this week was exceptional. We got two levels and the last one still being worked on by Vraj.
Hopefully I can finish all the music for the levels, then start work on the cutscenes as soon as possible.
Final Outcome
BIBLIOGRAPHY
Scirra Ltd. (2024). CONSTRUCT 3 MANUAL: TILEMAP. [Online]. Construct. Last Updated: January 2023. Available at: https://www.construct.net/en/make-games/manuals/construct-3/overview/the-interface [Accessed 16 January 2023].
Final Outcome
Group Project Evaluation
5th Feb MM XX IV
For this group project, our task was to make a game in the game engine, "construct 3". Genre being either, a shooter, platformer, puzzle or adventure game. In which we must plan, develop, make and work on the game, while including elements of audio, visuals and interactivity. The theme being "Elements", and we can interpret this in any we'd like or want. The deadline being today, the 5th of February.
My initial response to this project was instantly conjuring up ideas of an infinite runner/platformer as a google document. I had many, many gameplay mechanics I wanted to replicate and iterate differently. As these type(s) of gameplay and its gameplay loops were the kind that were sort of trouble-free, in the sense that our group wouldn't struggle with making and developing this into a more fleshed out game.
But I wished we sort of went for something more challenging in terms of scope, the gameplay mechanics and systems we had and worked on did present us tons of obstacles we had to manage to solve or patch. But the initial foundations we had laid out for, weren't complicated. On the other hand, it is amazing that we managed to "make" a game at all.
In the beginning few days, we had decided to change up the overall concept and ultimately how the game worked out. As an infinite runner, had presented us with a couple logistical challenges that we needed iron out and how we would actually code and finish this particular gameplay loop. So we opted for a level based platformer adventure. We aimed for 4 levels in the start, but due to some constraints, we cut down the last level, being the boss level. As we didn't have the time nor the technical know-how to execute it effectively.
During the production weeks, we faced many organisational barriers, as some members who would wait on others to work on the construct file. Due to construct 3 having a restriction on only one person working on it at the same time, so that the work done isn't overwritten by someone else's work.
Another problem we faced was our time efficiency. As some weeks we would drag on and delay certain tasks, as communication and scheduling wouldn't properly be worked on effectively as I'd like. As sometimes I felt like I did majority of the work, and my team members weren't on the same speed and pace as me. Due to me having a different approach to producing content, which led to me constantly having something new to work on or iterate on. I definitely could have slowed down a bit, to be on the same working level as the rest of my peers. But when quantifying the amount of days and weeks we actually can work on the game, made me realise I got to speed up and motivate others to be, slightly more heedful and attentive in our time restrictions.
On the note of "feeling like I did majority of the work". I did take on the role of being the leader, the one assigning my team members the roles and responsibilities of working on certain areas or parts of the game. Like the "cabal" system; ("small designated teams that “own” or work on a small portion of the game. Where its majorly used by Valve, as an effective way of making and producing their games.") As being the leader felt like a natural fit. And any project with a stern and effective leader can push the product over the finish line well. Dequan, Eshan and Vraj were really good in being able to work under my expectations in being able to produce their own utility to bring towards the team.
The one soft skill problem our whole team faced, is that none of us were artists, (Evidently in music I am), but in terms of graphics and drawings, no one was confident in their talents and abilities. But we used this to our advantage, making a scrappy little "flash-era" game. We tried to emulate art styles like "the binding of Isaac", and "fancy pants adventure". Simple "DIY"-y is what we all opted for, as it would be difficult to make something that elevates our artistic abilities.
In terms of technical challenges with the project. I learnt so many tools and programs that are invaluably useful. As well as continuing my current skills with programs like Adobe Premiere Pro, Aseprite, Fruity Loops Studio, and Piskel. Along with a couple niche programs that I had to overcome and learn by hand how to use effectively. Which at first were troubling to use, but as I pushed myself more and harder to work on tons of different aspects of the game, as I didn't want the game to turn out bad. My skills in using these different variating programs and applications improved the overall quality of the game by a ton.
Other team building moments our team had was the first ever issue we encountered, which was the issue with the slide mechanic. Apparently, the value of the "Bullet" mechanic wasn't actually set in stone, so spamming space just kept adding to the value of it, in which it would spaz through the level and clip through many "solid" obstacles. Easy fix was to just have it set at "400" or around that value. Which took me and Vraj a while to solve and fix in the beginning of the project. Later examples of a team building moment was, all of the group members in the studio taking turns making sounds and foley sound effects for the game. This was fun after weeks and weeks of stress. This was a good moment for everyone.
My previous pieces of research helped how the game is right now, as my understanding of animation and the principles associated with it. I have applied very effectively, as well as learning and understanding platformers in my unit 4 research. Like the tutorials and bullet proof environments that are present throughout games like "Rayman Legends", and the "Mega-Man" series.
I do like how scrappy the game looks, but one thing I don't like is the sound design, as we didn't focus on making foley and sound effects much, as the rest of the group were hard focused on making art tilesets and designing levels. And I focused on making music more. As I enjoyed the process of cooking beats and tunes on my "gaming" console. If I could change one thing, is to have an actual audio plan.
The various feedback and critical analysis we would do on the end of the weeks resulted in many fixes and patches to various problems.
Overall, I say this game is a success, I could have added more and more content to this game, but I couldn't with the time constraints and restrictions applied by the construct 3 engine. I have learnt that sticking to schedules and actually using it properly is super helpful in accelerating on what you need to do.
Analysing Game Trailers
First we looked at a couple game trailers of various lengths, genres, moods and types of advertising for the game.
- "Fortnite Chapter 4: Season OG Gameplay Trailer"
- This gameplay trailer showcases old game mechanics and gameplay from a couple years ago, and branding it as "OG", meaning "Original", in which lots of gameplay montages, clips, showcasing of the "Battle Pass" Cosmetics".
- Zelda Breath of the Wild Reveal Trailer
- This trailer has the developer telling us how this new entry in the Zelda series would be different to most of the games they have been releasing in the past decade. As its stated they want to go back to how the first Zelda game played, like you were actually exploring an ancient and lived in fantasy world.
- Then the second half of the game neatly transitions from a static image of Link on his horse, to a cinematic cutscene of how the game will feel and play like. Which instils excitement and thrills into any fan who is into this
- "Clash Royale: Gameplay First Look" Reveal Trailer
- Yo where we dropping
BIBLIOGRAPHY
Fortnite / Epic Games, Inc. (2023). Fortnite Chapter 4: Season OG Gameplay Trailer [Online]. YouTube. Last Updated: 2 Nov 2023. Available at: https://youtu.be/CZLcCeH2dHU?si=eSnAxcgpfNmjhfgx [Accessed 8 February 2024].
IGN / Nintendo (2014). The Legend of Zelda Wii U Trailer - E3 2014 [Online]. YouTube. Last Updated: 10 Jun 2014. Available at: https://youtu.be/XZmxvig1dXE?si=QlOChqn1m6QCWDzc [Accessed 8 February 2024].
Clash Royale / SuperCell. (2016). Clash Royale: Gameplay First Look. [Online]. YouTube. Last Updated: 4 Jan 2016. Available at: https://youtu.be/_hNxfiXmeAE?si=EjDXXrMIa7wNdTyY [Accessed 8 February 2024].
Creating a Game Trailer Workshop
Todays objects were to produce our own created, and edited game trailed based on our understandings of game advertising. And to reinforce your understanding of Premiere Pro editing tools. Like Cropping and adjusting clips, text editing and also editing audio files.
We were at first given our own footage of the game, played by our lecturer, but I decided to also record my own footage swiftly. Showcasing parts of the game that weren't shown in the original cut of the game. As well as a cutscene that was only accessible if you beat the first level. (Which I unlocked by just pressing the secret shortcut button "0" that unlocks the rest of the game)
I wanted to show the player can expect platforming, story cutscenes, excellent music, and the slide mechanic.

Here in the editor, I have went it a simple, story trailer, where I set up the game's story bits and how everything interconnects with each other. I went with half of the trailer showcasing most of the cool stuff that could happen